Tutorial: Applying wolf and hill climbing attacks to fingerprint recognition
Purpose
When an attacker has access to an SDK, for instance, using the same SDK as the system he attempts to target, he can carry out hill-climbing attack or wolf attack.
Hill climbing iteratively reconstructs an image (or feature) starting from an unrelated probe sample by sending modified versions. By gradually improving the result, the attacker can eventually compromise the system security. Hill climbing can be used to bypass either the sensor or the feature extractor.
Wolf attack differs from hill climbing in that instead of synthesizing new samples, wolf attack starts with a large database of biometric samples and attempts to find the closest match.
In this tutorial, we shall combine wolf attack with hill climbing attack to demonstrate the potential vulnerability of a minutiae-based fingerprint recognition system to these attacks.
A wolf according to Doddington’s original paper is a biometric sample belonging to different person than the target user (victim) that can produce very a high similarity score.
However, not all target user (victim) is succeptible to a wolf attack. In partivcular, the biometric traits of subjects who are more unique would be more resistant to the wolf attack. It is, therefore, sensible to combine both attacks by first introducing the wolf attack first followed by hill climbing in order to further expose the potency of this threat.
Procedures
The procedures outlined below will start with a wolf attack by using a database in order to find out which fingerprint templates (references) is closest to the target fingerprint template (reference). This is similar to a dictionary attack since a database is used.
Then, the we shall use the top three closest matching fingerprint templates and start hill climbing with them by randomly pertubing their minutiae. The top 500 candidates are then retained for each generation. The algorithm is then repeated for a number of iterations (generations).
Why three top closest templates and why capping top 500 candidates per generation? The reason is that we want to keep the computation to a minimum while ensuring some diversities. These numbers are parameters that you can optimise.
1. Mount a wolf attack.
We shall continue from a previous post in which a database of fingerprint features have been prepared using NIST’s fingerprint matcher mindct.
A text file named filelist_xyt.txt contains all the processed files in .xyt format. This file list serves as a gallery of zero-effort attack from which potential wolves can be identified. There are 200 unique fingers each containing 5 impressions, so making a total of 1000 samples. The 1000 fingerprint templates in the *.xyt format are stored in the features directory. The following Octave code generates the content of the file filelist_xyt.txt.
% In Octave
c = 0;
for u=1:200 %there are 200 unique fingers
  for i=1:5 %each having 5 fingerprint impressions
    c=c+1;
    fname{c} = sprintf('features/%d_%d.xyt', u, i);
  end
end

%% write to file
fid= fopen('filelist_xyt.txt', 'w');
cellfun(@(x) fprintf(fid, '%s\n', x), fname);
fclose(fid);
Let us now prepare the fingerprint to be attacked by extracting the .xyt features using NIST’s mindtct command line tool below. You should replace fingerprint2attack.jpg with your own file name. In practice, of course, an attacker would not have access to this raw data or its corresponding feature file in .xyt format.
%extract the feature
msg = unix('mindtct fingerprint2attack.jpg file2attack')
The above command outputs file2attack.xyt among other auxiliary files (which we won’t need).
We shall now use invokes bozorth3 to match the target file file2attack.xyt against the gallery of templates in filelist_xyt.txt; the result of which is stored in file2attack.scores.
% Matlab or Ocatave
cmd = 'bozorth3 -o file2attack.scores -p file2attack.xyt -G filelist_xyt.txt';
unix(cmd);
We could have run the command in bash directly.
bozorth3 -o file2attack.scores -p file2attack.xyt -G filelist_xyt.txtAs you might have guessed, the command unix gives you access to shell environment where you can execute a bash command.
The next lines of codes below then load the scores, sort them and plot the sorted scores.
scores = load("file2attack.scores");
wolf_scores = sort(scores);
filelist = textread("filelist_xyt.txt", "%s");

[~,index] = sort(scores,'descend');
best_xyt = filelist{index(1)}

%% plot the scores
set (0, "defaultaxesfontsize", 16)
plot(sort(scores))
xlabel('1000 Attempts (sorted)')
ylabel('Similarity scores')
print('-dpng', 'Pictures/wolf_attack.png');
The last line save the figure in .png format.

2. Visualize the fingerprint that is closest to the target template
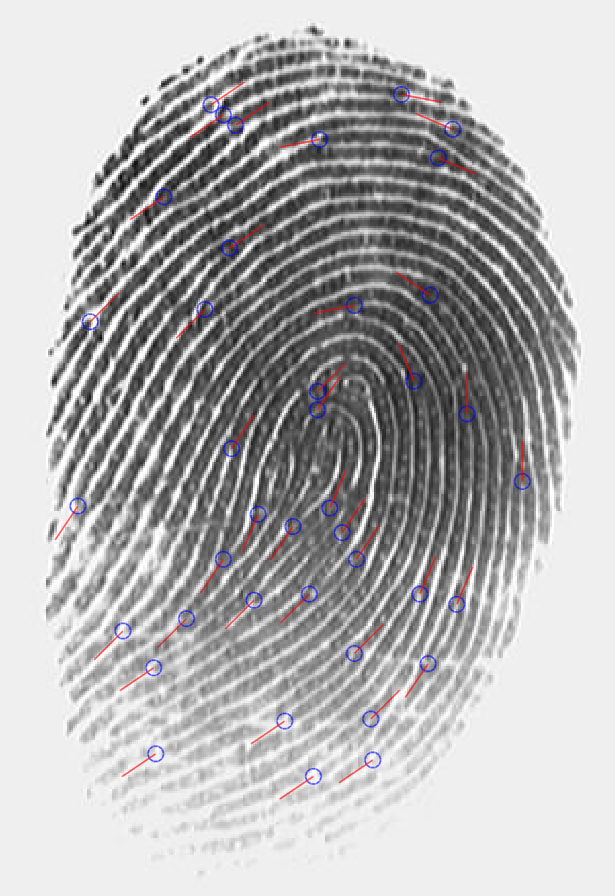
How does the wolf fingerprint, i.e., the fingerprint that is closest to the target template look like? To answer this question, I have written a function display_xyt to display the minutiae. Because it is an image, we have to reverse the x-axis; and this custom function does this for you. This function also takes in the magnitude variable, mag, which controls the length of the arrow of each minutia for visualisation purpose only.
function display_xyt(xyt, mag, img)
  if nargin<2||isempty(mag)
    mag=10;
  endif

  if nargin==3
    %reverse the x-axis first before plotting
    img(:,:,1) = img(end:-1:1,:, 1);
    img(:,:,2) = img(end:-1:1,:, 2);
    img(:,:,3) = img(end:-1:1,:, 3);

    imshow(img);
  else
    clf;
  endif
  hold on;
  plot(xyt(:,1), xyt(:,2), 'o', 'markersize', 16);
  for t=1:size(xyt,1)
    plot([xyt(t,1) xyt(t,1)+ mag * cos(xyt(t,3)/ 180 *pi)], ...
      [xyt(t,2) xyt(t,2)+mag * sin(xyt(t,3)/ 180 *pi)], 'r-');
  end
endfunction
Simply call this function for a given minutia template and its corresponding image.
The code below finds the closest template.
% Find the wolf template
[~,index] = sort(scores,'descend');
best_xyt = filelist{index(1)}
We now get the filename of the original fingerprint in .png format. f you want to copy and paste the code below, you should replace the variable original_png_folder with the folder where your original folder where the fingerprint images in .png are stored.
%Now let's load the original png file
out_ = strsplit(best_xyt, '/');
out_ = strsplit(out_{2}, '.');
original_png_folder = '/mnt/hgfs/C/Users/np0004/Documents/LivDET/data/2011/TrainingItaldataLive';
best_xyt_fname = [original_png_folder  '/' out_{1} '.png']
% I get :
% best_xyt_fname = /mnt/hgfs/C/Users/np0004/Documents/LivDET/data/2011/TrainingItaldataLive/118_5.png
Finally, having loaded the image and xyt file, we are ready to call the display_xyt function.
display_xyt(xyt(ii,:),20, img);This produces an output similar to the one below:
3. Carrying out the hill climbing attack
In order to carry out the hill-climbing attack, we shall define a supporting function which interfaces with NIST’s bozorth3 matcher. This function takes in a fingerprint template in .xyt which has four features per minutiae, namely row, column, orientation and quality and then outputs a set of slightly modified templates with some pertubation as controlled by pertube.
The function below, evolve_sample below simply produces 30 novel fingerprint templates, each of which differs by simultaneous change in the row and column of a minutiae. Note that this is just one of the many possible ways to evolve novel fingerprint templates. You can add or remove a minutia or change the orientation of the minutia. This is left as a hands-on exercise.
function [scores, samples] = evolve_sample(xyt, pertube, temperature)
  noise = randi(2*pertube * temperature,length(xyt),2) - pertube;

  samples = cell(length(xyt), 1);

  if nargin<2 || isempty(pertube),
    pertube=10;
  endif
  if nargin<3 || isempty(temperature),
    temperature=1;
  endif

  ii = find(xyt(:,4)>=0);

  for i=1:length(ii)
    noise_ = zeros(length(xyt),4);
    noise_(i,1:2) = noise(i,:);
    xyt_noisy = xyt(ii,:) + noise_;
    samples{i} = xyt_noisy;
    dlmwrite(sprintf('features/generated%03d.xyt',i), xyt_noisy , ' ')
  end
  txt=sprintf('features/generated%03d.xyt\n',1:length(ii));
  f_ = fopen('filelist_generated.txt', 'w');
  fprintf(f_, '%s',txt);
  fclose(f_);

  cmd = 'bozorth3 -o output.scores -p file2attack.xyt -G filelist_generated.txt';
  %cmd = 'bozorth3 -p file2attack.xyt -G filelist_generated.txt';
  [~,msg] = unix(cmd);
  scores = load('output.scores');
endfunction
If you have noticed, we have not made use of the temperature parameter in anyway. You could, for instance, control the amount (magnitude) of pertubation in this way. The algorithm used here is reminiscent of simulated annealing.
We now need to write the core function which consists of maintaining, say, 100 generations. In each generation, we need to cap the maximum number of candidates that we can evaluate in order to reduce the computation complexity. This is set to 500.
The steps taken are as follow:
1. Allocate memory to hold the output of 100 generations
xyt_generation = cell(100,1);
fitness = cell(100,1);
2. Select the top 3 wolf templates as ancestors to first generation of fingerprint candidates.
scores = load("file2attack.scores");
filelist = textread("filelist_xyt.txt", "%s");

[~,index] = sort(scores,'descend');

xyt_candidates = cell(3,1);
for f=1:3,
  xyt_candidates{f} = load(filelist{index(f)});
end;
xyt_generation{1} = xyt_candidates;

scores_prev = scores(index(1:3));
3. Begin the evolution
At the beginning of the loop, the algorithm takes all the candidates of current generation and evaluates their fitness in terms of similirity score. Once the fitness values are evaluated, only the top 500 candidates are kept, to be ready for next round of evolution; and the process repeats this way until the desired number of generations is reached (100 in this case). Below is the code fragments that implement this idea.
pertube = 10;
temperature = 1;

for g=1:100,
  printf('round %d - top score %1.3f (pop size %d)\n', g, max(scores_prev), length(scores_prev));
  fflush(stdout);

  fitness{g} = scores_prev;
  for c=1:length(xyt_generation{g}),
    [scores, samples] = evolve_sample(xyt_generation{g}{c}, pertube, temperature);

    if c==1,
        next_gen = samples;
        fitness_curr = scores;
      else
        next_gen = [next_gen; samples ];
        fitness_curr = [fitness_curr; scores];
    endif
  endfor

  [scores_, index] = sort(fitness_curr,'descend');
  n = min(500, length(scores_));

  %keep to the top candidates (up to 500)
  xyt_generation{g+1} = next_gen(index(1:n));
  scores_prev = scores_(index(1:n));

endfor

save working.mat fitness xyt_generation
The last statement saves the key variables. xyt_genration stores all the top candidates (up to 500) whereas fitness stores the candidates’ fitness value.
4. Analyse the score evolution
We shall analyse the number of (capped) candidates in each generation.
count = cellfun( @(x) length(x), fitness)

max_iter =  min(find(count==0))-1
maxfit = zeros(max_iter, 1);
for g=1:max_iter
  maxfit(g)=max(fitness{g});
endfor
count = count(1:numel(maxfit));
Then, plot the best scores along with the wolf scores for comparison.
close all; hold on;
plot([1:numel(wolf_scores), numel(wolf_scores)+cumsum(count')], [wolf_scores; maxfit]);
axis_ = axis;
plot([200, 200], axis_(3:4), 'k--');
xlabel('# of attempts')
ylabel('Similarity scores')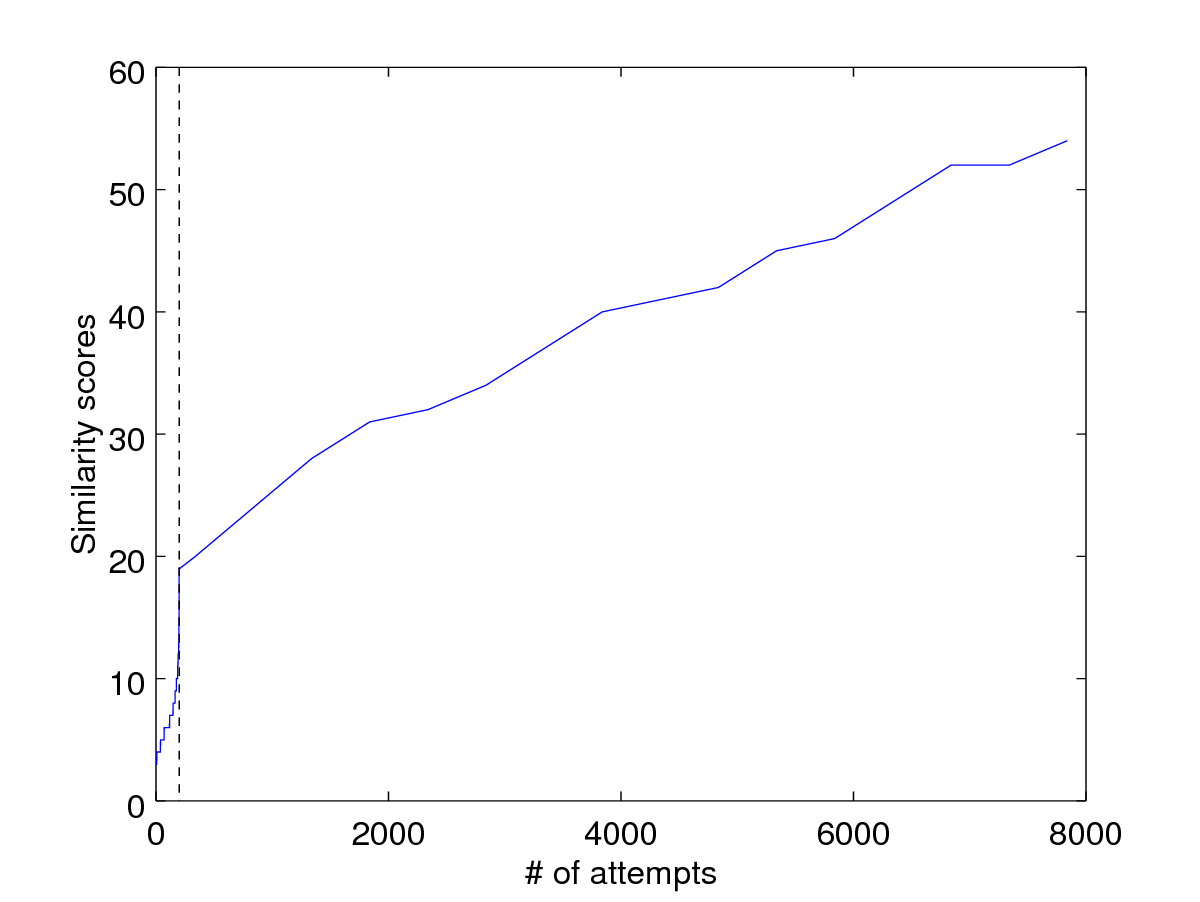
What do we observe here? The wolf attack is more efficient compared to the hill-climbing attack in this case. There is certainly room for improvement here for the hill climbing attack.
So, what improvements can we make here?
5. Visualize the best candidates in each generation
We can also plot the top candidate from one generation to another.
close all;
for g=1:max_iter
  [~, index]=sort(fitness{g},'descend');
  xyt = xyt_generation{g}{index(1)};
  clf;
  display_xyt(xyt);
  axis([0 640 0 480]);
  print('-djpg', sprintf('%02d.jpg', g));
endfor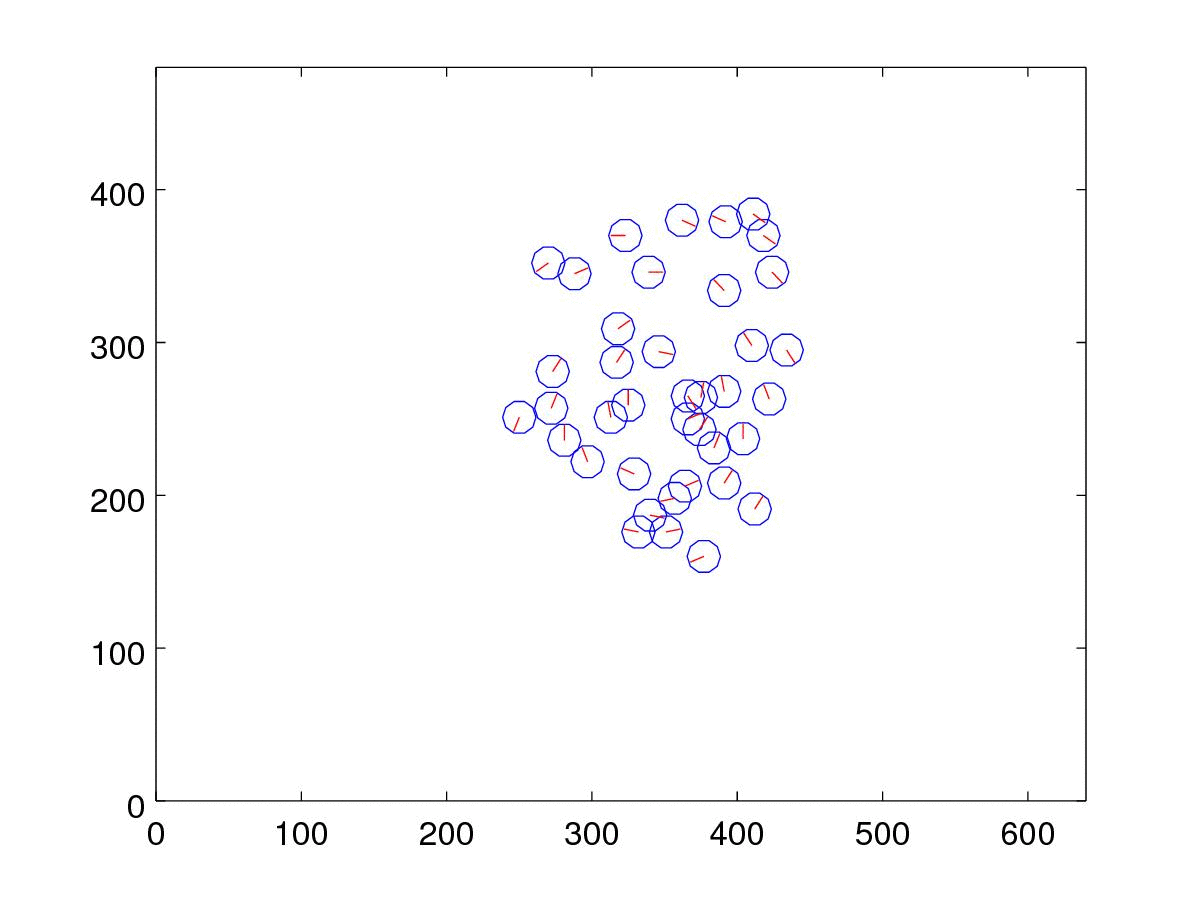
Cite this blog post
Bibtex
    @misc{ poh_2017_12_31_hill-climbing,
      author = {Norman Poh},
      title = { Tutorial: Applying wolf and hill climbing attacks to fingerprint recognition },
      howpublished = {\url{ http://normanpoh.github.com/blog/2017/12/31/hill-climbing.html},
      note = "Accessed: ___TODAY___"
    }